Thursday, January 11, 2018

Tips Mudah Basikal Bukit & Berbasikal Untuk Newbie


Salam Kayuhan Semua.
Ramai diantara kita yang sering mendengar ayat Newbie atau Beginner Broo.. Haaa.. tapi adalah penting bagi yang ingin mengetahui dunia kayuhan ( walaupun masa kecik2 dulu zaman hingusan sudah berkayuh tak kira roda belakang ada support atau tidak).

Untuk itu ada beberapa perkara yang perlu dielakkan dan tips untuk Newbie.

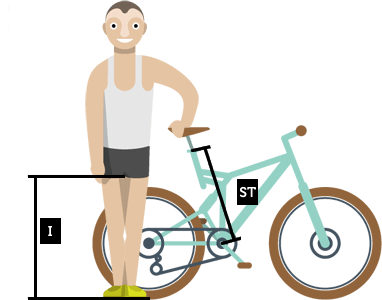
1. Pilih Size Frame yang salah.


Ianya mempengaruhi kita, untuk teruskan kayuhan , kalau semasa kayuh sakiit badan akan membuatkan kita malas untuk nak sambung kayuhan seterusnya... Menyebabkan sakit bahu, pinggang, lutut, dan sebagainya. Pastikan saiz basikal anda adalah betul .

2. Ketinggian Seat yang salah.


boleh menyebabkan sakit lutut dan mudah cramp (tangkap Mengkarung ayat belah utara) otot dibahagian paha.

3. Tidak menggunakan gear yang betul


How to Use Trigger Shifter
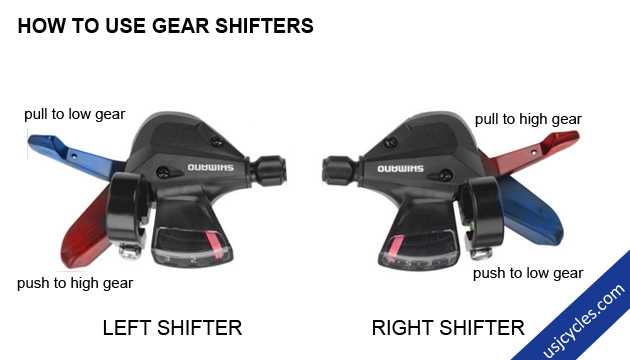
What are the functions of FRONT and REAR gears?
Left hand side gear shifter control the FRONT gears  [1 2 3] Right hand side gear shifter control the REAR gears [1 2 3 4 5 6 7  * ] .
* Smaller number means LOW gear, larger number means HIGH Gear.
What gear combinations should I be in?
Low gear combinations: FRONT gear [1], REAR gears [1 2 3 4 ] Medium gear combinations: FRONT gear [2], REAR gears [4 5 6 7] High gear combinations: FRONT gear [3], REAR gears [4 5 6 7 8]
Why can not use FRONT gear [1] pair with REAR gears [4 5 6 7 8]?
You can use that combinations, but it can weaken the drive chain as it is running curve line (see last image below).
* Above sample for 24 speed (3 x 8) MTB Bike.
Bike Gear Combinations - High Bike Gear Combinations - Low Bike Gear Combinations - Medium
Bike Gear Combinations - DONT
What are the effect of using HIGH, MEDIUM, LOW gear combinations?
High gear –  Heavy in pedaling (low cadence) but bike move fast (normally flat road).
Medium gear –  Slight lighter than high gear, but bike move slower (normally leisure ride).
Low gear – Light in pedaling (high cadence) but bike move slow (normally slope or uphill).
Cadence = Pedaling Speed. * Pedaling speed is depending your legs strength
What gear combinations for beginner rider?
Medium
 gear. Put middle gear constant to [2] and just shifter the rear gear [4 5 6]. You will feel the slight heavier when you shift the gear from 4 to 5 or 5 to 6.
TIPS: If you feel heavy in pedaling, just shift the right gear to smaller number. If you feel light in pedaling, just shift the gear to larger number. 
4. Ikut Trend atau Pro Cyclist (UPGRADE).


Frame carbon, aksesori tambahan, kasut clip, peralatan performance. Peralatan ni boleh upgrade kemudian selepas kita mahir dan kenal dengan handling dan teknik berbasikal.

5. Tidak membawa tools atau tube dalam tambahan.


sumber Youtube

Alatan asas seperti tyre lever, tube spare, mini pump amat perlu jika trail yang dituju adalah sukar seperti Offroad. survivor repair teknik dan Mikegyver perlu ada jika berdepan dengan situasi tube bocor dan mekanikal failure. 

6. Tidak membawa air atau makanan tambahan seperti Power Bar.


Air sangat penting supaya tidak dihydrate dan gula untuk menggantikan tenaga yang telah hilang.
senang2 bawa la kurma beberapa biji dan air yang mencukupi.

Jangan terlebih muatan.

7. Respect setiap Pengguna jalan raya dan laluan berbasikal.

Kak Yung😉

Otai

Group Jamboree

Bagi menghindari perkara yang tidak diingini berlaku, seperti terjatuh, selisih dengan pengguna laluan yang lain, perlu fahami etika dalam group ketika berbasikal serta tidak malu bertanya teknik dan tip berguna semasa berbasikal. Lain group lain Otai. Minta bantuan dengan rider2 yang telah lama menceburi dalam berbasikal.

8. Banyak membaca dan mencari maklumat tentang berbasikal.


Capaian Internet di hujung jari anda. Rajin2 lah mencari serta banyakkan membaca buku tentang berbasikal.

Selain itu terdapat banyak lagi info2 yang berguna tidak dapat daaa nak letak dalam post sini. 
Jenuh nak menaip, hihih.. Apa pun selamat Membaca. Adiosss....

Friday, July 24, 2015

Frame size chart for mountain bikes

Mountain Bike Size Chart

Measuring Your Leg Length/Inseam I

Take off your shoes. Stand against the wall. Place your feet apart. Put a book between your legs, with it's spine firmly up against your crotch. You should feel as if you are seated on a bicycle saddle. Have someone measure from the floor to the spine of the book.

Frame Measurement ST

Mountain bikes are measured from the center of the crank (or bottom bracket) to the top of the seat tube. Mountain bike frame sizing is generally measured in inches (in).
Inseam (in/cm)Seat Tube (in)Crank Size (mm)Size
25.0/6413170XXS
25.5/6513170XXS
26.0/6614170XXS
26.5/6714170XXS
27.0/6914170XS
27.5/7015170S
28.0/7115170S
28.5/7215170-175S
29.0/74 16170-175S
29.5/7516170-175S
30.0/7616175S
30.5/7717175M
31.0/7917175M
31.5/8017175M
32.0/8118175M
32.5/8318175M
33.0/8419175L
33.5/8519175-180L
34.0/8619175-180L
34.5/8820180L
35.0/8920180L
35.5/9020180L
36.0/9121180XL
36.5/9321180XL
37.0/9421180XL
37.5/9522180XL
38.0/9622180XL
Consult bicycle shop for a professional fitting!

Thursday, June 27, 2013

Bike Safety - Cyclist Pre-ride Checklist


Bike Safety - Cyclist Pre-ride Checklist


Check Your Bicycle and Your Gear before Your Ride
A checklist is a good way to make sure you have what you need for a safe and enjoyable ride. These are items you should consider taking on a long bike ride.
Most emergency gear will fit easily in a special bag that attaches under your bicycle seat. These bags are sold at bike shops and come in a variety of sizes and styles.

Safety and Emergency Repair Checklist
  • Properly fitting helmet
  • Sunglasses or other eye protection
  • Pump (consider a pump frame that attaches to bike)
  • Patch kit or spare tube
  • Toolkit for basic repairs, including wrenches that fit your bicycle
  • Rain gear
  • Your driver's license or other ID, plus an emergency contact person and medical information
  • First aid kit
  • Reflectors and flashing rear safety light
  • Brightly-collared clothing to improve visibility
  • A few dollars for emergencies
Make sure you know how to repair a flat tire and practice at home before you need to do it on the road. Most bike shops offer classes on basic bike repair.

Comfort and Clothing Checklist
  • Padded gloves to reduce pressure and "road shock," which can cause numb or tingling fingers
  • Bike shoes with firm soles make pedalling more efficient.
  • Bike shorts with a padded lining eliminate seams and make cycling more comfortable.
  • Anatomic bike seat. Bicycle seats (saddles) come in a variety of shapes and sizes. To find the best one for you, try several types.
  • Jacket to block wind and rain.
  • Arm warmers, leg warmers, extra clothing as appropriate
  • Clothing that wicks moisture will keep you dry and comfortable.
  • Sunscreen
  • lip balm with sun protection
Many cyclists use clip less pedals that allow cycling shoes to lock into place. A simple twist of the foot releases the shoe from the pedal. Clipless pedals allow cyclists to pull up as well as push down on the pedals and create a much more efficient pedal stroke and faster speeds.

Other Essentials Checklist
  • Map or cue sheet or good directions
  • Energy foods, snacks or extra cash
  • Adequate water and water bottle cage or hydration pack


Pre-Ride Safety Inspection
Before each ride, perform a safety check of your bicycle. This only needs to take a minute or two, but will help prevent avoidable accidents.
  • Check the tires for proper inflation (marked on the side of the tire). Check the tire treads for excessive wear or other damage, such as embedded glass or other objects.
  • Check the brakes. Spin the wheels to check for rubbing and then apply the brakes to ensure they stop the bike smoothly and evenly. Check the brake pads for excessive wear.
  • Check the cables and housing to make sure there is no fraying or splitting.
  • Check the wheel quick release levers to ensure they are secure.
  • Check for any loose parts or other mechanical problems.
  • Do a slow-speed ride and inspect bicycle, brakes, and shifting before you leave your driveway.
  • Following these guidelines will go a long way to enjoying your bike rides and will often help you prevent unexpected incidents or a long walk home.

Monday, June 24, 2013

Trail kayuhan Kulim Lunas

Kayuhan Santai Kulim Lunas

Route : tah mana member bawa pi kayuh. Trail ada laluan pokok getah, 
ladang kelapa sawit. kawasan kampung sungai seluang.
Distance : 30 km Saja laaa.
Starting point : Rumah Shirman WD.

Start jam kat tangan : 11.00am. Apa janji lah member, kata nak kayuh kul 
8.30am. 
Kaki yang Ketaq nak Kayuh : Mat Ujai Downhill, Mat Shirman, Pak Ku, Tok Anas, Latok Shahril aka badang WD.


Masa Kayuhan Pagi tu memang tersasar dari agenda yang dirancang. Member ada yang baru balik kerja shif malam. ok la sebab start lambat. 


Ladang kelapa sawit yang luas. sesuai dengan team gerek sawit rider mtb. hii..

Rasa nyaman udara kat sini walaupun taik lembu banyak. (sekali Bom Taik Lembu) nyaris x lenyek. kalau tak penat la basuh gerek .

Ada banyak lagi gambar kayuhan ni. klik je link bawah ni.


Sedim Vista Outdoor Package

Special Offer for all....limited time only...please contact us for detail info...


Email Us at: sales.sedimvista@gmail.com
Call Us at: 012-4012779

Tuesday, July 6, 2010

Kayuhan Tupah

Selasa, 06 Julai 2010 KAYUHAN RIADAH tUPAH

Route : Giant Sungai Petani – Kampung Sungai Pasir – Taman Sinar Intan – Kompleks Jeti Sungai Merbok – Tamesa Semeling – Hutan Lipur Rekreasi Tupah.
Distance : 40 km Saja laaa.
Starting point : Giant SP. GPS ( 5°37'0.99"N - 100°28'13.35"E).
Ikut calender la : Selasa, 06 Julai 2010.
Start jam kat tangan : 9.00 am

Kaki yang Ketaq nak Kayuh : Mamat,Jat Sp, Mat Yord SP, Fazli SP, Zul, Junaidi.

Kayuhan kali ni best jugak. Layan member2 baru yang nak rasa sengsaranya kayuhan MTB ni.

Tempat mula kat Giant SP, slalu jugak starting point kat sisi bukan sebab apa lepas habis kayuh boleh pekena makan ais krim Giant looo. Dah la layan gambar x seberapa ni....


Trail Kayuhan ni..